
Georg Lukas, 2023-08-04 18:07
This post is about shooting 16-color EGA (1984) styled retro photos right on the 4$ ESP32-CAM board and storing them to µSD in the arcane TGA (1984) file format.
For that, we need to read RGB images, convert them to 16 colors, apply dithering, and store a TGA image file.
ESP32-EGA16-TGA source code on GitHub.
Introduction
This year's Shitty Camera Challenge has some space for digital cameras, and so the author experimented with different devices. The last one, the ESP32-CAM, was obtained after the HomeAssistant setup wizard promised an easy way to monitor analog utility meters with camera and AI, and what could be shittier than a 4$ camera PCB?
ESP32-CAM
The ESP32-CAM turned out to be even shittier than anticipated. Of the four sensors ordered, three had visible defects. The image quality is green. The board pinout is ridiculous, with the LED flash wired to the SD data line, the PCB LED blocking WiFi, and no fully usable GPIOs.
Still, the ESP32 is quite a beefy beast for an embedded SoC, with a 240MHz 32-bit core and ~500KB of SRAM on die, plus some 4MB of PSRAM on the board to store camera pictures. The pictures can be streamed over WiFi or stored to a µSD card, giving us some flexibility.
The CPU and memory specs are far beyond 1980s desktop computers, so we are not limited in the choice of algorithms to perform our task, and we can easily cheat where needed.
The platform is supported by Arduino IDE and by PlatformIO, typically programmed in C/C++, and there are example projects to implement a webcam or to take pictures to µSD.
Reading RGB data from the sensor into memory
The camera API supports various streaming formats, from pre-compressed JPEG to RAW:
typedef enum {
    PIXFORMAT_RGB565,    // 2BPP/RGB565
    PIXFORMAT_YUV422,    // 2BPP/YUV422
    PIXFORMAT_YUV420,    // 1.5BPP/YUV420
    PIXFORMAT_GRAYSCALE, // 1BPP/GRAYSCALE
    PIXFORMAT_JPEG,      // JPEG/COMPRESSED
    PIXFORMAT_RGB888,    // 3BPP/RGB888
    PIXFORMAT_RAW,       // RAW
    PIXFORMAT_RGB444,    // 3BP2P/RGB444
    PIXFORMAT_RGB555,    // 3BP2P/RGB555
} pixformat_t;
The easiest format for us to process is RGB888, with one byte for each of the three colors, stored in a two-dimensional pixel array. Except when the API is a lie:
E (1195) esp32 ll_cam: Requested format is not supported
Luckily, the github-actions bot closed the issue as completed, so it's
solved, right? RIGHT??? The error message comes from
ll_cam_set_sample_mode()
and its source code reveals that the actually implemented options are:
PIXFORMAT_GRAYSCALEPIXFORMAT_YUV422PIXFORMAT_JPEGPIXFORMAT_RGB565
Greyscale gives us one brightness byte per pixel, but we want to have colors. YUV422 stores two pixels in four bytes and requires a color space conversion. JPEG requires that as well, but only after parsing and uncompressing the JPEG file. RGB565 stores one pixel in two bytes, with five bits for red and blue, respectively, and six bits for green. That gives us enough headroom to do some dithering for a 16-color palette and spares us from non-linear luminance and chrominance formulas.
Furthermore, RGB565 can be converted to RGB888 with just a bit of bit shifting, so there we go. We configure the camera to take images in QVGA (320x240, close enough to the EGA 320x200 original) into PSRAM:
camera_config_t config;
/* ... snip boilerplate ... */
config.pixel_format = PIXFORMAT_RGB565;
config.frame_size = FRAMESIZE_QVGA;
config.fb_location = CAMERA_FB_IN_PSRAM;
esp_camera_init(&config);
However, after firing up the image sensor and taking a shot, we realize that everything is green. Not monochrome green, but bad-white-balance green. The suggested workaround is to give the camera some time to calibrate after enabling auto white balance, by taking and discarding a few shots:
sensor_t *s = esp_camera_sensor_get();
/* Enable AWB and AWB gain in auto mode */
s->set_whitebal(s, 1);
s->set_awb_gain(s, 1);
s->set_wb_mode(s, 0);
/* DO NOT DO COPY THIS! Set contrast and saturation to max for the EGA effect */
s->set_contrast(s, 2);
s->set_saturation(s, 2);
/* Take and discard a few pictures */
for (int i= 0 ; i < WARMUP_PICS; i++) {
  camera_fb_t *fb = esp_camera_fb_get();
  if (fb)
    esp_camera_fb_return(fb);
}
After that (with WARMUP_PICS=10), the image is less green. Not quite
true-color, but acceptable. The raw RGB565 image bytes (320*240*2 = 153600 of
them) can be found in fb->buf:
As noted above, the image is 320*240 and not 320*200, as the EGA card didn't
have square pixels. We can compensate that by just skipping one of each six
rows when converting. Then we just can fix the aspect ratio in post-production
for modern PC displays, by scaling up to 200%x240%.
Interlude: viewing RGB565 images
An obvious intermediate step when developing a camera application is storing the "raw" or "intermediate" pixel arrays right to "disk", i.e. the µSD card.
RGB888 images can be trivially converted (and scaled up for modern displays) by ImageMagick, the author's favorite image processing CLI:
convert -depth 8 -size 320x240 input.rgb -scale 200% output.png
There is no direct driver for RGB565, but there is this RGB565 parser pattern and it leaves the author speechless. WTF. ImageMagick is the Swiss army knife of image processing, but is this Turing complete?!?
So maybe the second favorite image processing tool has something in the pipeline? Oh yes indeed:
ffmpeg -vcodec rawvideo -f rawvideo -pix_fmt rgb565be -s 320x240 -i input.rgb565 -f image2 -vcodec png output.png
Et voila! We can store intermediate pictures, test individual phases of the pipeline and see where things go wrong. The ESP32 µSD interface is quite slow, so storing the "huge" 150KiB and 225KiB images takes a second or so of intensive flash LED blinking. And that LED gets rather hot, so watch out for your fingers!
EGA 16-color palette
The EGA color palette was a natural choice for this experiment, because its 16 colors are well known and still in use today in terminal mode applications (including most things you can access through SSH), and while they don't go back to roman horse asses or 1920's punch cards, they were created by IBM in 1981 for the IBM CGA adapter based on a simple one bit per color plus one intensity bit scheme, and an analog hardware hack to replace the ugly yellow ocher with a slightly less unpleasant brown.
The result are the following natural colors beloved by retro pixel artists, perfectly suited for photography:
| 0 #000000 | 1 #0000AA | 2 #00AA00 | 3 #00AAAA | 4 #AA0000 | 5 #AA00AA | 6 #AA5500 | 7 #AAAAAA |
| 8 #555555 | 9 #5555FF | 10 #55FF55 | 11 #55FFFF | 12 #FF5555 | 13 #FF55FF | 14 #FFFF55 | 15 #FFFFFF |
Technically, the full EGA color palette has two bits per color, resulting in 64 total colors, but you can only ever choose 16 of them, and as the defaults are well-known, we are sticking to them.
To provide the best resulting image quality, for each pixel we will pick the closest EGA color, by minimizing the Euclidean distance in three-dimensional space, or in different words, we'll calculate the squared differences for each color channel and pick the smallest one:
for (int i = 0; i < 16; i++) {
  int delta_r = abs(EGA_PALETTE[i][0]-r);
  int delta_g = abs(EGA_PALETTE[i][1]-g);
  int delta_b = abs(EGA_PALETTE[i][2]-b);
  int match = delta_r*delta_r + delta_g*delta_g + delta_b*delta_b;
  if (match < best_match) {
      best_match = match;
      best_color = i;
  }
}
We could implement a fancy look-up-table for each of the 65536 possible RGB565 values, but we have plenty of CPU cycles and not so much RAM, and only 64000 pixels, so we just do the look-up for each of them.
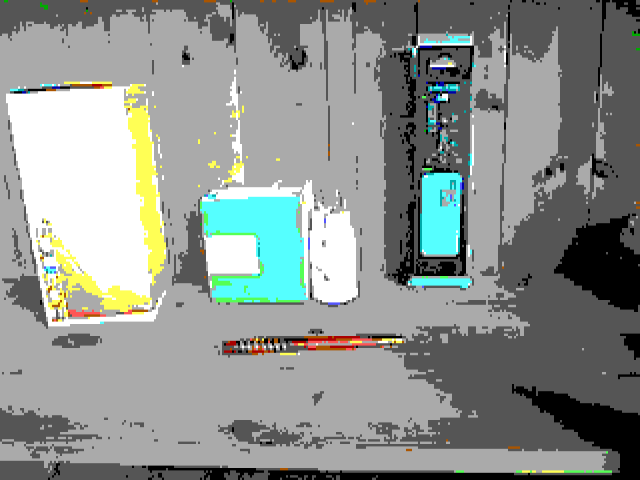
The results look surprisingly monochrome, with just a few colored areas. It turns out that the low saturation of the ESP camera sensor maps most real-world motives onto the four shades of grey when using the "closest color" approach. To increase the saturation, we'd have to convert our pixels into another colorspace, so let's look for a different approach.
Dithering of photos to 16 colors
The standard (old-school) technique to map natural colors to a limited palette is color dithering. There are different algorithms, with different trade-offs, resulting in different image quality.
The simplest one, average dithering, assigns the closest palette color to each pixel, and we've seen it in action above.
Floyd-Steinberg from 1975 is the most sophisticated one, giving the most natural results and having a nice natural and irregular pixel distribution. It works by taking the error (difference between the original color and the mapped palette color) of each pixel, and spreading ("propagating") that error out to the neighbor pixels below and to the right. This creates a statistical distribution of colored pixels proportional to the level of the respective color in the image. The algorithm is clever by only applying the propagation to pixels right and below of the current one, allowing to process an image in a single linear pass.
However, it means that we need to change pixel values one row ahead in our buffer, and adding something to a pixel's color might overflow it, so we need to clip values to the (0, 31) or (0, 63) range. However, we can get a very good approximation by only propagating the error to the next pixel in the current row, with much less work:
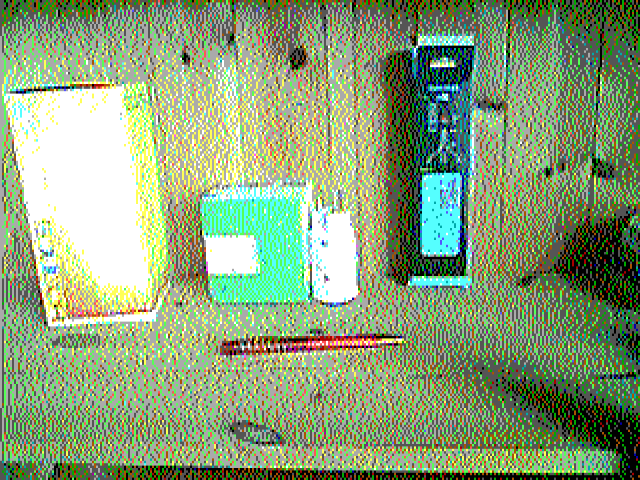
There are slightly noticeable vertical line artifacts at the left edge, as we reset the error variables at the beginning of the column (otherwise, colors from the right edge would "bleed over"), that wouldn't be there with the two-dimensional approach of Floyd-Steinberg. Beyond that, this is already too good and almost too true-color to really count as a shitty image.
There is one approach that was easier to implement on 1980s hardware (and that allowed better compression of the images), and that is ordered (or Bayes) dithering. It's using a (most often square) threshold table that is applied repeatedly to the image, changing the respective colors and resulting in a visible cross-hatch pattern.
By simply taking a bayer pattern table from StackOverflow, and doubling the threshold values to compensate for the pale camera colors, we get this:

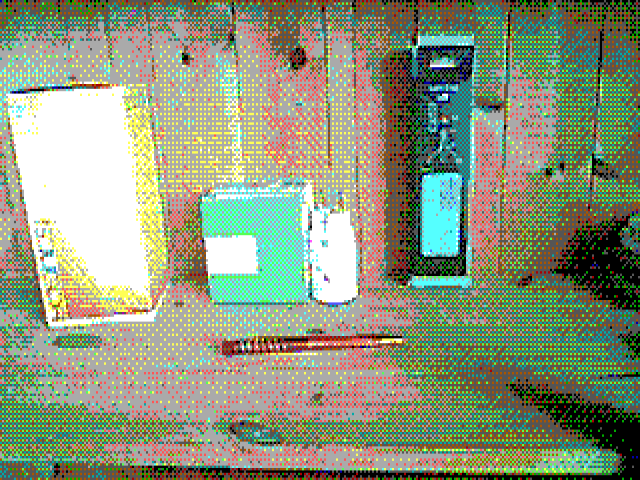
Now why is this so monochrome again? Well, the Bayer pattern is applied individually to each of the three color channels, and we are using the same pattern position for the three channels of a pixel, so effectively we always apply a greyscale threshold. By simply shifting the pattern one pixel to the right for green and one pixel down for blue, we get a much better result:
Perfect! That's exactly the desired image quality to compete in the Shitty Camera Challenge!
Saving as TGA
Actually, TGA wasn't the first choice format for this project. The author's favorite is PCX (1985), which is only slightly younger than TGA, but was supported by the author's favorite image editing tool, that also featured the most creative versioning scheme: Deluxe Paint II Enhanced 2.0.
However, the author's favorite image viewer, Geeqie, fails to properly display PCX files, and fixing that was way out-of-scope for this project, or so the author thought. So we stick to TGA, which seems to be properly supported based on throwing a few test files at it.
The file format is simple when compression is disabled, coming with a small 18-byte header followed by the palette (in BGR order, not RGB), and then the packed raw pixel data, from bottom to top.
Well. In theory, TGA supports various color depths and palette types from 1 bit per pixel to RGBA. What we have is a 16-color 4bpp (4 bits per pixels; not to be confused with the "BPP" bytes-per-pixel used in the ESP32 headers) image with a 16*3 byte palette. However, the image processing tools that claim to "support" TGA don't actually accept arbitrary variants.
- Geeqie silently fails to display a 4bpp image
ImageMagick mis-treats anything non-default as 8pp with an opaque error message:
convert-im6.q16: unable to read image data 'shitty_133.xyz.tga' @ error/tga.c/ReadTGAImage/457.
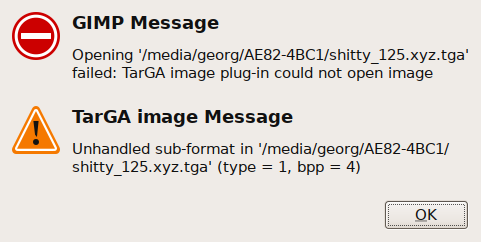
So we have to artificially inflate our pixel data from 4bpp to 8bpp, and because the tools will also ignore the "number of colors in the palette" field and instead use the "number of colors in the image" field, we need to store a full 256-color palette in the file, of which we will only use the first 16 entries:
memcpy(tga, &header, sizeof(TgaHeader));
for (int i = 0; i < STORE_COLORS; i++) {
  tga[sizeof(TgaHeader) + i*3 + 0] = EGA_PALETTE[i % COLORS][2];
  tga[sizeof(TgaHeader) + i*3 + 1] = EGA_PALETTE[i % COLORS][1];
  tga[sizeof(TgaHeader) + i*3 + 2] = EGA_PALETTE[i % COLORS][0];
}
for (y = 0; y < HEIGHT; y++) {
  src_pos = y*WIDTH;
  dst_pos = (HEIGHT - y - 1)*WIDTH;
  memcpy(tga + sizeof(TgaHeader) + 3*256 + dst_pos, framebuffer + src_pos, WIDTH);
}
The remaining code of the project is based on existing examples. Find the full ESP32-EGA16-TGA source code on GitHub. Beware, it's as shitty as everything shown above, to fit into the project. This is not production-quality C code.